Aikibatto 5 DetailsUke nagashi OMOTE
DetailsAspects and considerations already treated in a previous exercise of Aikibatto, are omitted here.
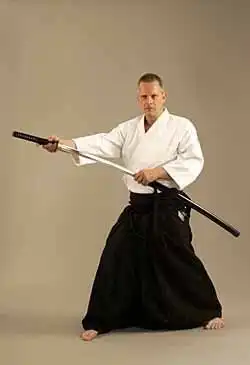
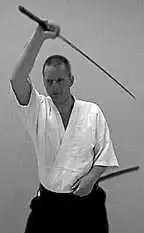
Drawing the sword for uke nagashi, the saya should be turned around before the sword leaves it, to avoid accidentally cutting oneself in this move. When extended, going up to the high position, the sword is turned back by a firm movement of the wrist, which helps to ward off uke's sword, in case of contact. It is important to draw the sword far out, when getting it out of the scabbard, and then bring it back some in the parry, so that the whole move has a slightly elliptic track. If the sword is not drawn in this extended way, part of it may still be in the scabbard, when it is lifted. Also, the extension and rounded return of the sword makes for better protection than simply lifting the sword right up to parry.
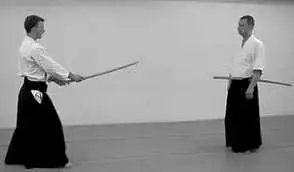 Starting position. Tori at right, uke at left. Omote, straight, is the first of the two Uke nagashi, the other being ura, reverse. This pair of omote and ura, intensely used in aikido, is much more than terms for the opposite directions of approach. Originally the words refer to the inside and outside of clothing (the fur from an animal), and they are full of implications. Omote is what is seen, ura the hidden, omote is the direct and ura the indirect, and so forth. These two principles are best expressed in Aikibatto and in aikido if omote is done in a spirit of straightforwardness, whereas ura should be done with a measure of surprise, something totally unexpected and hard to comprehend for uke, even after the technique is completed. With omote, uke is immediately aware of what happened although not having been able to stop it but with ura, uke is almost mystified, confused. In aikido and in these exercises omote and ura are on a superficial level represented by stepping inside of uke's guard in the former, and outside of uke's guard in the latter. The drawing of the sword in movement three, is preparing for the uke nagashi parry, by turning the scabbard around, so that the edge of the sword points to the floor, as mentioned above. Therefore, the draw has to be done with a gentle hand, or there is a risk of cutting through the scabbard. The sword is pulled out in an extended move straight forward, with the hilt remaining in the front.
Immediately after the parry, tori puts the feet together, turns toward uke, grabs the sword with both hands, and then kesagiri, the diagonal cut, stopping above uke's neck. It is possible to do the cut very quickly after uke nagashi, if the parry is done correctly, ending with a good jodan sword position. Kesagiri, the diagonal cut, has its name from a quite rude samurai joke: kesa are the suspender straps worn by zen monks, crossing over the chest in pretty much the direction the cut is supposed to go. The difference in angle between the straight cut and the diagonal kesagiri, is not very big at all. The cut should go from uke's neck on one side and out by the waist, or not even exiting the body, on the other this does not take as much of an angle to do, as one might think. This cut can be done in two different ways one with the body leaning in a slightly diagonal way, the other with the body straight.
In this exercise, then, the body remains in the slightly tilted position until, in movement nine, the sword point enters the scabbard, which is turned so that the edge of the sword points upward. So, when the blade is adjusted into the position it will have when resting in the scabbard, that is the very moment when the body straightens. When lowering the sword in movement seven, one keeps it going in the track it would follow if the kesagiri had been pulled through to gedan level. If the leaning way of doing the cut has been used, the body continues to lean with the same angle.
Iai considerationsIn iai style single training of the tori movements in this exercise, the modifications of the above would be: the kesagiri in movement five is not stopped at neck height, but pulled through to gedan.Uke's movements in this exercise are not very meaningful to practice in a iai solo style.
Stefan Stenudd Table of movementsNext exercise© Stefan Stenudd, 2000. You are free to any non-commercial use of this material, without having to ask for my permission. But please refer to this website, when doing so.
AikibattoIntroductionBackgroundAikibatto BasicsSword exercisesJo staff exercisesSolo video clipsDuo video clipsKen suburiCorrectionsGlossaryVisitor responseShinken, the swordAikibatto the book
About CookiesMy Other WebsitesCREATION MYTHSMythology in general and creation myths in particular.
TAOISMThe wisdom of Taoism and the Tao Te Ching, its ancient source.
LIFE ENERGYAn encyclopedia of life energy concepts around the world.
QI ENERGY EXERCISESQi (also spelled chi or ki) explained, with exercises to increase it.
I CHINGThe ancient Chinese system of divination and free online reading.
TAROTTarot card meanings in divination and a free online spread.
ASTROLOGYThe complete horoscope chart and how to read it.
MY AMAZON PAGE
MY YOUTUBE AIKIDO
MY YOUTUBE ART
MY FACEBOOK
MY INSTAGRAM
STENUDD PÅ SVENSKA
|
 Uke nagashi is a most essential parry, used in many situations. In Aikibatto Shoden two exercises use it, similar except for the direction taken by tori after the parry. The uke nagashi should not block the way of uke's sword, the two blades need not even touch it is just an additional precaution. In the actual parry position, the blade should be turned so that the edge is pointing slightly inward, a bit toward tori, so that uke's sword, if touching tori's, will slide along the side, almost back, of tori's sword. That way no edge is damaged. Tori's sword should not be turned so much inward, though, that the edge points at tori, for obvious reasons. Furthermore, the sword should be held so high, that if pushed by uke's sword toward tori, it would pass above the head.
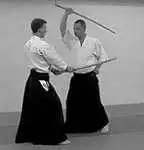 The sword is then lifted upward and slightly back, into the uke nagashi position, in movement four. The draw and the parry are, of course, one joined, flowing move. At the moment of the parry, tori's body is slightly twisted sideways in a taisabaki posture not very much and tori's left foot should have followed the right one a bit, so as to avoid uke's blade completely, even at a gedan cut.
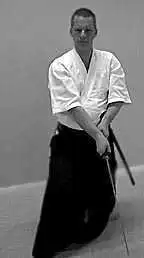 Cutting with the body straight would be best for the beginner, since it is important to establish the ability to always have a straight posture. This way of cutting can easily be applied in this exercise too. Then, the sword is not held at jodan kamae right before the cut, but slightly to the side of the head, or even as far out as in the hasso gamae, the guard where the sword is held above the shoulder. The important thing is to hold the blade so that the edge is already directed exactly the way it will go in the cutting move or one is sure to make an insufficient cut.
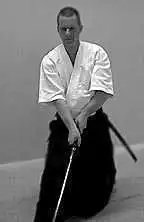 Cutting with the body leaning has got its points, too, once the student has learned a good posture. By leaning a little when doing kesagiri, the actual cut is, in relation to one's own body, exactly the same as the straight cut. This is the most powerful way of cutting, because of the symmetry of the body, and also has the benefit of sticking to the most important training in the sword arts that of refining and perfecting the straight cut. The body leans ever so slightly, since the angle needed for the kesagiri is not very accentuated, and it is very important that one does not bend the body, but tilt it in a straight way well, like the tower of Pisa.
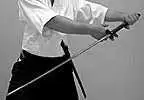 The chiburi best used from this position, is where the sword is sort of whipped to the right, then pulled back to a position in front of tori, where the hilt is to the left and the sword point to the right, just above tori's right knee. This should be an extended position, so that tori's arms are not bent but held out, and thereby the sword is held out at some distance from the body. It is a bit like presenting the blade to oneself, and actually, the position is intended for wiping off the sword properly with a cloth, before returning it to the scabbard.
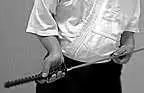 The noto for this chiburi starts with the right hand reversing its grip on the hilt. Then the left hand lets go and the sword is allowed to swing, by gravity and no additional force, so that the point of it goes from right to left side. There the sword is stopped, to be entered into the scabbard. As said above, if the leaning way of cutting kesa has been used, the body straightens up at the moment when the blade is turned so that its edge points upward. Note that when the blade is entered into the scabbard, the right hand grip on the hilt is pretty much the same as in chiburi gedan of HIDARI and MIGI.
 Aikibatto Sword Exercises for Aikido Students